Showing posts with label everyday living. Show all posts

Wednesday, January 14, 2015

Looking back: The Techniques and Art Challenges that Defined my 2014

I can't believe it is already 2015. 2 weeks in and I'm already getting swept away. It has been a crazy past year, but full of many new adventures and discovering both myself as a person and an artist. I had the wonderful support of 2 new regulars for 2014, and they challenged me and pushed me to do many new things!

I learned that I should expect less to be done in November and December between a convention and the travel time to see family for the holidays. So here's a recap of the FIVE new techniques etc that really defined my 2014!

1. Ombre Dyeing
My first true example of ombre dyeing started with a sunset and this little girl. Fading one color into another made for a beautiful hand dyeing technique and opened so many doors to different themes and expanded the stories I could tell with my work. It put a modern twist on my traditional techniques and made for a feast for the eyes.


2. Wings:
This year is all about wings. Goose wings, posable wings, fairy wings. I really went all out this year starting with these beautiful 1 meter goose wings. Learning wing and feather anatomy as well as constructing the bone structure to allow for opening and closing really made for my crowning glory this year! Definitely bought a lot more wire this year.


3. Clay:
When I first experimented with polymer clay, I really wanted to add it to my pieces as antlers, claws, and really make my pieces mixed media pieces. It started with an jackalope, but I really learned what I was doing when I made this beautiful winter buck. He was the perfect way to finish 2014 as well as teach me I can't bake thin pieces of clay in my oven at the stated temperature. Clay really gives me another medium to communicate through, and I couldn't be more grateful.


 4. Felt Flowers:
Nothing made me happier this year than taking my use of wool to the next level with both wool felt flowers as well as wet felted flowers. I never knew I could do these things with fabric that I have done with tissue paper, and they really allow me to explore this material to a entirely new dimension. Not only am I using felt to make scarves for my pieces and keychains, but now I can layer, cut, and felt to make beautiful pieces that can stand alone or pair perfectly to an ombre dyed doll.


5. Sewing Full Time:

Last but not least, I got to try sewing full time this year. Granted, I am still finding my niche in the market, but it is definitely enlightening to see what it means to sew 50+ hours a week and think about the numbers all the time. It made me think about what I was sacrificing in my art in order to make ends meet, and if I really wanted to do it as a job. We all know that when you are working vs doing a hobby, some element of enjoyment does leave. It really showed me what type of artist I want to be, and how I want to carry on with my art. Time really gave me a lot of food for thought, so I hope to share more wonderful things with you in 2015 as I straddle both being a teddy bear maker and a general plush artist.

Thank you so much for reading. I hope you've enjoyed my 2014 as much as I have. I really appreciate all the support and love you've given me. 

As always,
Keep in touch,
Laine

Wednesday, July 16, 2014

4 Projects at Once

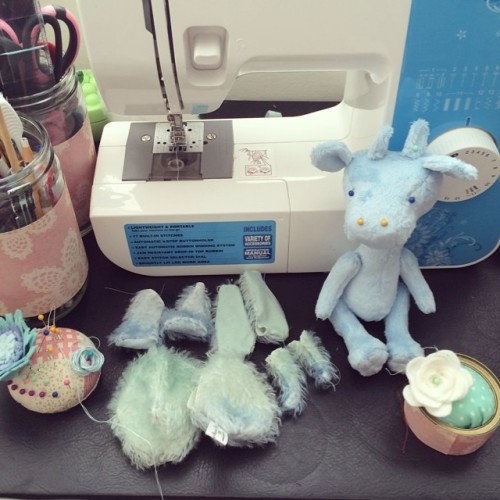
In the past, I've never had more than one project open at a time. Sometime over July 4th weekend, I ended up running out of eyes and needing a couple other things to complete commissions, so naturally I put my current project (blue giraffe) on hold and my goose commission on hold to start more con prep and when I wanted a break from that, I started doing some sewing for my second commission.

 LO AND BEHOLD, the package with all the things I ordered came that day, so I was more than torn in a few directions. I didn't like having multiple unfinished things at once so I settled in and spent the good remaining of the day finishing what was closest to completion: 5 shoot star plushies to go with the original

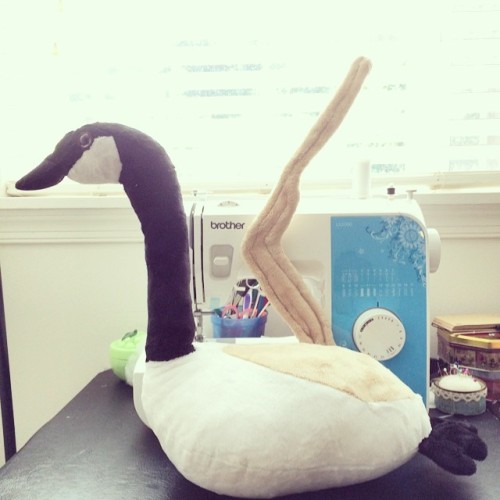
Then I wet to approach my largest priority: the Canadian Goose

After working two full days of 10+ work hours, I had the head done right, ultrasuede beak on (nearly killed my wrists), neck made with skeleton, body sewn and stuffed, and the beginnings of a wing in progress. I'd have to recommend to those who use wire not to twist two pieces of 12 gauge wire together and then try to get your machine to hem it in. I broke 2 machine needles because the wire wasn't twisted 100% uniformly (and you can't see it under the minky). There were times when I was chugging along, that I would just hit that twisted wire and BAM off it snaps and usually I have to go in with tweezers to remove the broken portion out of sewing. This task actually can prove to be quite tough given the thickness of the minky+batting+wire. I thought about sewing it, but the wings themselves are quite large to begin with. If I were to annotate through my process,this post would get too long.

In the end I compiled a mental pros and cons list in cause I ever decide to have so many things going on at once:

Pros:

  • There is variety, so you can keep your interest from waning by working on a few things at once
  • Can increase efficiency (do all your cutting at once, sewing, assembling)
Cons
  • Can feel overwhelming esp to people who require certain amount of control in their life to function
  • Can lead to being distracted because you DO have the option to work on multiple things
All in all, I'm trying for less structure when it comes to myself and doing things more with my energy levels. Once I finish these I will probably go back to my original arrangement, but it was definitely interesting (and stressful).

Question for you: Do you typically work on one thing at a time or multiple projects? I'd love to hear your pros and cons list.

Until next time,
<3 Laine

Wednesday, March 12, 2014

Tools of My Trade

I've been meaning to make this post for a while now but for one reason or another haven't. It's mostly because usually at the end of a project my desk looks like this:
 The level of chaos here is quite...remarkable. I have patterns sticking out left and right, a mug, sewing machine stuff (bobbins & needles) sitting on top, rubbing alcohol (even though I'm not working with clay), and it's just quite..chaotic to say the least. So after looking at that for a while, I really needed to clean it for my sanity's sake. After a cleaning makeover it looks like this.
Cinderella Pop Up Paper Cut Out was a homemade VDay gift 
I am quite limited in elbow room once my sewing machine gets added to the desk. When I'm hand sewing though, I like to take it to my bed. One thing I pride myself of is being able to pack all my sewing supplies for a single project into a 1 quart zip lock bag, so I thought it was a time to show you what I use and give a brief description of how I use them.

1. Sewing Scissors, 2. Regular Scissors, 3. Embroidery Scissors, 4. Hemostat

  1. A girl's best friend has to be these sewing scissors. I absolutely love them. When I originally started sewing I never used sewing scissors because they weren't worth the investment for me since I had a 3 dollar pair laying around, but the more fabric I worked with, the more stress my hands felt, and I simply needed them. I ONLY use these on fabric, ribbon, and thread and nothing else.
  2. I use my regular scissors for pattern making, cutting cardboard, cutting plastic nubs off plastic eyes, and lots of other miscellaneous things. 
  3. Curved embroidery scissors are useful for trimming threads in small tight spots as well as trimming the fly aways off my needle felting. The curve keeps the scissor from cutting more than it should. I pair all three of these scissors with a scissor sharpener which for 2-3 dollars saves you the cost of having to replace your scissors.
  4. Last but not least is my smallest hemostat. I have these in 3 sizes and with different tips but I personally prefer the curved tips. They act as a combination of tweezers with the leverage of a scissor. Mine generally have teeth on them for added grip and they are great for turning small pieces of fabric and stuffing. Choose the size that best reflects your projects otherwise you'll end up with a hand cramp.
    5. Felting Needles 6. Darner Needles 7. Pastel Brush 8. Paint Brush 9. Permanent
    Pastels 10. Doll Needles 11. Pin Cushion & Pins
  5.  Next up are my assortment of things I need to make the face of a doll. First off I start off with felting needles, and I have these in a variety of sizes for shaping and doing the detail work of my doll's faces. They have little barbs on them that catch the wool fibers to lock them into place in order to form a shape.
  6. I use darner needles to put in eyes and also as a substitute for an awl. They come in a variety of sizes and I use thick or thin ones depending on the size of the hole I need. For example, when I joint a doll, I pick the darner needle that is the same size of the pin so I know the hole I am making will be sufficient.
  7. This pastel brush has a sponge applicator that slides onto the pastel blade. I used this to add more concentrated amounts of color
  8. Camel haired paintbrush that I use to apply pastels when I want a softer feel to the shading. 
  9. Permanent pastels are chalk pastels that contain pigment with a binder. You can purchase these in sticks or already ground up (panpastels) I use these to blush my dolls and shade their faces, ears, and limbs.
  10. When I do any type of needle sculpting, I use doll needles of an appropriate length for ease of sculpting. Used in conjunction with a strong thread, this will give you control to create more depth for the eyes on a doll
  11. Most important thing for sewing and for marking. I like a flat bottomed pin cushion so the pins cannot disappear into the cushion. I use both quilting pins, normal pins, and the small tailor pins (the ones you see on men's formal shirts)
    12. Water soluble marker 13. Gel pen 14. Jewelry pliers 15. Fiberboard discs
    16. Tailor's Chalk 17. Sewing Gauge
  12. Water soluble markers (comes in white and blue) are always useful for tracing on your pattern or making any markings. Simply spritz with water after you're done sewing, and the color should fade. (Might want to test this on a scrap piece just to be sure. It's harder to get it off some fabrics)
  13. Gel pen for marking dark minky because nothing else will stick to minky
  14. Jewelry pliers are used to joint dolls. I have a combination one that also has a wire cutter. The tip of the pliers is used to curl the cotter pin
  15. These discs are half the team in a cotter pin joint. The pin itself is not shown. I use several sizes depending on the size of the doll
  16. Tailor's chalk (comes in white and blue). I use this to mark fabric when I want nice straight lines. It's water soluble but it should also rub out, so I find it is best to use this when the marked fabric isn't being extensively handled. It would be annoying to have to constantly reapply
  17. A sewing gauge can help check seam allowances, make small measurements, and just to double check markings. It has a slider to help mark the measurement
So those are all my essential tools. When I'm packing up my sewing to work somewhere other than my desk, I usually bring some combination of these 17 items in addition to fabric and thread. These are not all the things I use in my doll making, but I use these each time I make a doll.

Hope this mini guide can help you build your own tool set.

Until next time,
Laine

Thursday, December 12, 2013

In my own little corner

I had promised my followers a tour of my room if they wanted it. I've been meanig to compile the photos and post this but life has gotten in the way.

Anyways while my plate is incubating, I will show you a tour of my house. These are the main parts of it (except my bathroom , there's only a toilet and a shower there, not even a sink, & kitchen space) All you see here is within one room. I only have 1 window, so the light throughout these photos will be different depending on how far away from the one window they are


This is where I start every morning. By now, the two peas in a pod have been delivered and the star is waiting for its owner to claim it.  My bed is lofted 3 ft off the ground so I can store my dye pot, suitcase, pokemon cards, and a few books & bottled water under it.

Next we'll move to the second place I go with the start of my day. Usually I start my day by doing dishes. I only have this sink so I have to keep it clear of stuff. (Don't ask about the kitchen space, it's disgusting, which is why I never lived with 3 male housemates before) As you can see my dishes drying on a dishcloth, I keep all my kitchen stuff in my room because it's not sanitary outside of my room.

3rd important place is my closet. This is all my clothing for 4 seasons. I am photosensitive so I wear the same long sleeves 365 days a year. NO, I am not a sparkly vampire, I simple get hives in the sun. I have a large thing of white vinegar for washing my shower curtain, cleaning, and a little for dyeing mohair. Most of it gets used in cleaning.

The next place I spend most of my time here, whether sewing or working on hw. You see the ice cream machine on which I have a pad of scrapbooking paper? When you see me during LSes (me not my hands) my laptop is sitting ontop of that little space. There's really not that much room on my desk. One day I will have half a room for sewing. For now this little corner will do. (On my table you see Tovi before he was completed)

Whenever you see me disappear off screen this is where I go. My fabric is stored in the bottom bin with the top bin full of miscellaneous stuff. I keep my wool felt, business cards, and other miscellaneous stuff in this little corner.

For those who are interested in this colorful spectrum, my fabric collection has certainly grown this year. 6 months ago I barely had half these colors, now I've rearranged them so I could always pull out what I want without having to dig through all of them (I still need to take the big green carton) off first though)

So that's most of it. I didn't show you two of my drawers where I store dolls, textbooks, and toiletries or where I keep my vacuum and fan, but this is most of it. At least all the important parts. I hope you enjoyed my little corner of this earth! I certainly feel at home in my own space.